Wednesday, May 5, 2021

Implementation of a 100Tb SAN Array (for Multimedia Production)

A colleague of mine enlisted me on a mission to deploy a 100Tb SAN onto a small 12 device network. At first I thought this would be overkill until I was notified that they deal with 400Gb to 2Tb sized files and they currently have 64Tb of actual NAS storage but that isnt enough and the speed on the network was not designed for mass storage file transfer such as these.

It was during this project that I thought, hey, why not document this using the newly found methodologies that I currently improved on over a couple of projects before.

Currently I am using the following to manage this project:

Redmine: turnkeylinux.org ready out of the box, you configure to fit your needs. It has built in calendaring, gantt charting, up to date emailing of newly changed documents to everyone in your group and a variety of other options.

TreeSizeFree: To keep a hierarchy of the files in the project by date accessed

Access Time and Billing: Built in free time and billing database by MS Access, easily configurable and additions on the fly are available.

With these three apps as my issue, asset and file management tools, its easy to maintain everything, conversations, meetings, documentation, outlines, project scope of work planning and the list can go on.

For the 100Tb SAN requirement we shot out a lot of RFQ (Request For Quotes) to various vendors: Studio Network Solutions, Promise, Tiger, NexSan, Exasan, Starwind, Tiger Tech, FreeNAS, TrueNAS, SAM-SD, Quantum, Infortrend, B&H Photo, HP, Dell, Nexenta, Data-core, 45 Drives, Aberdeen, Merritek and a few others. Almost 25 vendor RFQ's

Also, in order for this newly developed SAN to be useful, the client also needed their network upgraded to 10G capabilities. We shot a few RFQ's out to the following vendors: HP, Dell, Netgear and various cabling installers to get feedback on the cheapest way to do it without sacrificing productivity.


So here goes, after several meetings, consistent research, quotes, demos, trial software and headaches from certain vendors taking forever to shoot the quote out to you, we finally got it down to three vendors products. These are the final solutions we went with:

Penguin Computing: For the complete SAN solution that included the following:


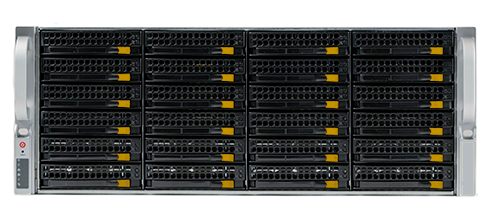
  • Supermicro 36bay Chassis (24 bays in front / 12 bays in back)
  • 4U, 36x 3.5" Hot Swap SAS Bay, 
  • 2x 2.5" Hot Swap SATA Bay w/ 2x 1280W Hot Swap PSU 
  • Dual Intel Xeon E5-2620 v3 CPU (6C, 2.4GHz, 85W) 
  • 64GB RAM, DDR4-2133 ECC, 2R (8 x 8GB) 
  • RAID, LSI 9361-8i 12Gbps SAS w/ CacheVault: HW RAID 0/1/5/6/10/50/60
  • 4 x Drive Tray, 3.5" to 2.5" Bay
  • RAID 5 Volume: 2235 GB (4 x 800GB SSD, 2.5", SAS, 12Gbps, 3 DWPD, MLC) 
  • RAID 6 Volume: 40054 GB (9 x 6TB HDD, 3.5", SAS, 12Gbps, 7200RPM, Nearline) 
  • RAID 6 Volume: 40054 GB (9 x 6TB HDD, 3.5", SAS, 12Gbps, 7200RPM, Nearline) 
  • Integrated NIC, Intel I350, 2x RJ-45/GbE Integrated BMC, 
  • Aspeed AST2400, 1x RJ-45/100MbE (Dedicated IPMI) NIC, 
  • Intel X520-DA2, 2x SFP+/10GbE Standard Rails 2x Power Cord, for PDU with C13 outlet (C14/C13), 1m
This particular setup leaves 14 bays available for another Raid5 SSD SAS setup as well as another 42Tb of usable storage expansion capacity

IQSS: Had everything that Penguin had for a few dollars less, but they were comparable so they are in the loop, their warranty offering matched Penguins as well.


Tiger Technology: For the Content management, workflow scheduling, transcoding, ingestion, replication & backup and ease of use software we went with TigerStore and TigerBox1 for the MDC (Meta Data Controller).

The deciding factor that made us reach our decision was:

  • Current technology for a fraction of the cost (Other vendors were in the $80-100k range)
  • Ability to expand in the future (Adding more drives or an expansion bay)
  • Warranty offerings (Penguin gave a 5yr/next business day onsite for pennies)
The SAN solution was designed to handle three different duties:

  • Act as an editing station on the first silo (RAID5 SSD)
  • Provide redundancy and storage on the second silo (RAID6 SAS)
  • Provide archival storage and prep files for second location within building and for offsite cloud backup to secure storage

The following vendors were then used to monitor, backup and encrypt the data on and offsite:

Veeam: backup and recovery of files, data, vm's, etc...
Spiceworks Network Monitor: to keep track of all activities happening on the network with alerts setup for text/email based responses
Spiceworks Asset Management: For monitoring all pc's, switches, routers and other devices on network that utilize an ip address based transport


Thursday, July 25, 2019


Four Ways To Drive Pinterest Traffic to Your Blog
written by: brian baccus brands
posted on: july 24, 2019
Pinterest traffic generates a consistent influx of visitors to your evergreen content, regardless if you are posting new content every day or even every week. In this post, we will cover four key ways you can drive Pinterest traffic to your blog – setting up your account correctly, optimizing your boards, pinning quality images, and maintaining your account.
Pinterest + Us
Shortly after our first year of business, we realized that we needed to expand our reach from local clients to national and international customers. To do that, we relied heavily on Pinterest to drive traffic to our website. Very quickly our site grew from a few visitors each day to a thousand visitors from Pinterest each day. Over the years, as we have rebranded and changed our blog content, Pinterest traffic drives a significant amount of traffic to our website. As a result, we use this traffic to generate passive income through affiliate links and digital products.
Set up your Pinterest account correctly
The username, name, and description used for your Pinterest account should be the same one you use on other social media profiles, such as Facebook, Instagram, and Twitter. Whether Pinterest or any other social media profile, your profile description should include keywords and phrases that are relevant to your brand. Consistent messaging across social media profiles reflects highly on your digital legitimacy.
Once you create your Pinterest account, you want to make sure you do two things – (1) convert your personal Pinterest account to a business Pinterest account and (2) verify your website through Pinterest. When you verify your Pinterest account, you will be able to set up Rich Pins. Rich Pins provide additional information on your pins from your site, regardless of if you pinned it or someone else.
Create relevant Pinterest boards
Your Pinterest boards should align with your blog niche. For example, if you are a food blogger, your boards should all be related to food. If you are interested in using Pinterest for other things, then create a personal account for those off-brand topics.
To optimize your Pinterest Boards, utilize these four best practices:
·        In each board, you should include a thorough description of what kinds of pins users can find. The descriptions should include relevant keywords and phrases. In our Instagram board, you can see what keywords and phrases we use to identify the types of pins found there.
·        Use tools such as Tailwind to analyze your boards’ virality score. This score shows the number of engagements each pin receives. The higher the score, the better for your images, board, profile, and website.
·        Strategically engage with group boards. You might find yourself invited to several group boards. When determining what group boards to join, make sure they align with your content and have more followers than your current profile. We found that several boards had poor virality scores and fewer followers, so we left those groups.
·        Use Tailwind’s Tribes to share your relevant content. I’ve been utilizing Tailwind Tribes to promote our graphics. It’s a way to share graphics without getting penalized with a low-quality group board.
·        A few years ago, you could delete and move pins, and it would result in a significant improvement in your Pinterest traffic. Since their algorithm changed, this method is not as reliable. We still recommend removing low-quality pins. During our sabbatical of blogging, we removed anything with poor engagement; our Pinterest followers grew by 1000+ without pinning any new content. Food for thought!

Pin quality matters
The best way to grow your Pinterest profile is to pin high-quality, beautiful images. Pinterest is full of hideous graphics. It’s pretty easy to stand out with beautiful templates. Using blog post templates to create a strong and consistent brand presence can have a lasting impact. Potential readers will be able to identify your content quickly.
When you are playing around with Pinterest templates, identify what sorts of pins do best for your brand. For example, long infographic type pins always do significantly well for me. Simple blog post templates do okay. Thus, WE spend more time creating infographics when possible. The type of graphic that works for your brand varies on your niche. Infographics don’t make sense for food bloggers, but long-pin collages do!
Anytime you pin an image from your website, always include a detailed description full of keywords and relevant search terms. We can’t emphasize how much this plays a part in creating viral pins. When I’m pinning our images, we take extra time to make sure that the descriptions are optimized. There are plugins you can use for this, but we prefer the manual approach.
When pinning content, make sure you are diversifying your content. Your pins should be a healthy mix of your images and others. Aesthetically, other people’s graphics should have a similar style to your pictures. Your pins (whether from your website or someone else’s) reflect your overall brand, so those pins should follow your brand standards.
Pin frequency
The easiest way to drive Pinterest traffic to your blog site is to pin frequently. Pin your content from your website (even the old stuff). Your readers will share your images on Pinterest, but you should be the first to pin your images. Instead of pinning all of your graphics at one time and the same image repeatedly to different boards, you can use Tailwind to schedule your pins for optimal engagement.
Pin images to multiple boards, especially if you are a member of group boards. Pinning the same image to multiple boards ensures that different audiences can view your image, which helps with virality score.
Consider deleting old pins with low engagement. If you have images that are not driving traffic to your website, you might want to consider reshooting them or updating the Pinterest graphic. Your Pinterest profile should be full of pins with high engagement. If the pins are really old, do not worry about doing this, they will be pushed down the board to show the newest ones first.
How to schedule pins to Tailwind?
With the Tailwind extension tool and app, you can easily schedule pins from your browser or phone. Here’s how you can schedule pins:
1.    Click the Tailwind browser toolbar.
2.    Select the pins you want to schedule.
3.    Click “Go Schedule!” button in the bottom right-hand corner.
4.    Assign the boards you want the pins to show up. You can also keep pins in your drafts queue by selecting “Save for Later.”
How many times a day should you pin on Pinterest?
Schedule between twenty to a hundred pins a day. Using tools like Tailwind, you can build up a queue of pins. So start small, such as twenty pins a day. As you add more pins to your queue, you can adjust the number of pins you publish. By using this approach, you will always have a healthy queue of pins ready to go. It’s better to be active 365 days a year with twenty pins, then pinning 100 images one day a year.
What is the best time to post to Pinterest?
Fortunately, you don’t have to guess at it (like Instagram). Tailwind calculates the best time for you publish your pins. When you set up your schedule, you will select how many times a day you want to pin. Then, Tailwind will identify what times work best for those pins.
Action Steps
If you need to do an internal audit of your Pinterest account, first focus on cleaning up your profile and boards. Once those are optimized, sign-up for Tailwind and start scheduling all of your images (even ones you’ve previously pinned). Focus on pinning evergreen or seasonally relevant pins first. Once you get everything cleaned up, you will find that you can work smarter, not harder.

I hope this information in this blog has helped you. It has helped up all the way up until this point and its just getting better. Follow us across the board at Brian Baccus Brands and Style Click Media


Friday, March 25, 2016

IT SMB Success Summit 2016 - Datto Virtual Backup

So I am always looking for news ways to do things better, faster and more efficient. And since I'm keen on becoming one with the software/hardware that I deem necessary in today's networking world, there are, on occasions, opportunities that present themselves without my specific searching for them. I found a great product that I have had the benefit of using for about a year now made by a company called Datto.

Now Datto has been in existence since 2007 and currently is one of the DR (Disaster Recovery) modules that I have on a couple of vm's on my network to preserve the business continuity of the network. In other words, this solution has saved my ass numerous times, whenever the network I have it implemented into suddenly has a hiccup and a server goes down.

Instead of running around in a panic to get the specific server back up and running, I simply log into the network, access the Datto box, in this case, the Datto Alto device, and switch it to be able to give user access to the server that it has been storing images on. Depending upon the frequency of the incremental image back up, it will pretty much continue the users where they left off.

If you are wondering how this works, first off, here are the specs of the Datto Alto2


  • 1 TB 2.5” 7200 RPM Hard Drive
  • Dual Network Adapters
  • Two 3.0 Ports on Front USB
  • Up to 4 Simultaneous Virtual Machines
  • AMD 1.5 GHz Quad Core Processor
  • 8GB DDR3 RAM
  • 2-4 Agent Licenses
  • 3 Year Hardware Warranty

The Datto AltoXL specs:


  • 1TB-24TB Local Storage Capacity (Per Unit)
  • Hot-Swappable Drive Bays for Easy Field Upgrades
  • Available Intel Atom 2.4 Ghz 8-Core Processor
  • Unlimited Server, Workstation and Desktop Licensing
  • Solid-State OS Drives on All Models
  • End-to-End Encryption
  • Up to 32GB RAM Standard
The Datto Alto has a simple web-based GUI that allows you, in a few simple clicks,  to go from server down to back in business in no time flat. As we know, most companies are running hardware that's at least 5-8 years old. In the healthcare industry, providers have to keep their systems up and running due to the EMR's that they use tend to demand high resource capabilities. When a specific server goes down, that usually spells disaster for the MSP handling the managed services of that network.


When implementing a device such as this into a network it would be safe to say that having a device that closely matches the specs currently being used by the server its backing up should shore up fairly close, if not exceeding it. Datto does not disappoint there, giving that a current user utilizing this has the same specs as the Alto2, it was a no-brainer. 

In a few short minutes the Datto Alto2 was up and running and backing up the current server at bare metal capacity. The system can be setup to collect an image every 15min, hour or day. Since this user does not have too many server failures, I configured it to sync images at 7am, 12pm and 7pm, this way if something should happen, they would only lose up to 4 hours of work in the mornings and 5 hours in the afternoons. Some may say that it should back up more frequently but you do have to take into consideration that it only has a 1Tb capacity and this user has 750gb of EMR database files that have to be retained for up to five years per HIPAA compliance regulations

Datto recommends a 2 to 1 ratio on space used (for instance a 500Gb server would need 1Tb of available space on the Datto to ensure all incremental backup will not interfere with business continuity.

Overall, I am impressed with the Datto Alto2 and their other products arent bad either. If you have a desired interest in this product give me a call as they do not sell directly to the public.

Friday, March 18, 2016

IT SMB Success Summit 2016 - March 16 - 17, 2016 - Conference In Review

Over the next few weeks I will be reviewing and speaking on the conference that I attended in Orange County this week: IT SMB Success Summit 2016.

I will attempt to cram everything that I learned into one page segments, profiling various software and hardware that most of the vendors there were showcasing.

Currently I have a VMware vSphere 6 lab setup that consists of 2 - Dell R610 servers and 2 - Dell 28xx switches, with an additional 12Tb NAS and 40Tb SAN currently being built and configured to the network to be attached soon. All vSphere6 downloads come with a 60 day full version trial and since its a lab, I can reinstall the trial after 50 days to start the 60 days trial process all over again without affecting the vm's that reside on it (You are probably wondering how that works, another blog topic to come)
Current virtual network consisting of 2 Dell R610 servers, 1 Dell 2848 and 1 Dell 2810

The current ISP is Verizon FIOS and the current router configuration is setup with 150m download / 150m upload bandwidth speeds 

I also have VirtualBox 5 on my Lenovo W540 super powerful media workstation that has 32Gb of Ram, 1 256Gb SSD hard drive, 1 - 1Tb SSHD hard drive and within Virtual Box there are 4 vm's availabe with any two running currently. I use this to do demonstrations when teaching other consultants about certain versions of Windows servers
Lenovo Thinkpad W540 with 32Gb Ram running Virtual Box with 2 vm servers deployed


With this network I am able to build, configure, deploy test and review various software and hardware items that vendors are currently marketing

Essentially the virtual network has 10 vm's running on it ranging from Windows Server 2008 and 2012 to the newest version of 2016 with a few Windows 7 and 10 vm workstations for testing client/server deployment scenarios. When testing software products on this network, having old to new versions of OSes is an asset during the review process.

If you are an IT professional or are aspiring to be one, this takes it to another level, focusing on the business owner and not necessary the IT tech that already works for a company. I also suggest that you purchase some equipment and build a test lab such as I have to give you a hands on mindset when approaching the testing phase on such products.

These reviews are geared to give you some insight on the mindset of the current level of technology, where its going and why its relevant. 

Stay tuned:


IT SMB Success Summit 2016 - March 16 - 17, 2016

So since I inquired about products from Datto, I was invited to participate in a prestigious IT conference in Orange County this week called the IT SMB Success Summit 2016.

The group sponsoring this event, The ASCII Group, is a conglomerate of IT professionals pared with various sponsors that offer products that most in the industry use, would like to use or are just plain curious about.

The thing I like the most about this conference is that they encourage network and interaction between sessions and suggest that you bring at least 175 business cards as you will really be exposed to IT pros from across the country, some even came from as far as Germany, Italy, France and Japan.

The most intriguing part of this conference is that I did not fall asleep one time. Breakfast and Lunch was provided and it was lovely. This conference is normally $1,800 but being a part of Datto's company made it absolutely no cost to me, nice.

The agenda was concise and they kept things rolling and on time since there was SO much information to process. In fact, this one conference has given me plenty of blog information that I will be bringing to the forefront for the next month.


The conference was actually two days with a meet and greet with drinks and food, but I do not live near Orange County and didnt want to drive there twice. Nonetheless, it was a very worthwhile conference to attend and the knowledge, networking, meeting of vendors and new IT faces to be able to bounce things off of was all worthwhile.

I have provided a link below if you would like more information on this group and its benefits, trust me, if you are an IT professional, this is the group you wanna have in your corner

The ASCII Group: Benefits

Saturday, March 12, 2016

Networks that should not be in existence

Currently as of 1/2016 I am testing various products and have built my own virtual lab network.  As a consultant in the past, I ran into various network infrastructure setups and sometimes they weren't setup the proper way that they are supposed to be.

Most of the consulting projects I worked on were for small businesses that have about 5-30 employees so you would think that the network would be setup correctly, RIGHT.........wrong. That has not been the case as of late, I have ran into networks where the router is directly open to the public and they are using public ip addresses on the computers instead of using local private IP addresses, the server closet is not even locked or cooled causing some peripherals to crash continuously, all the employees are administrators (disaster when one leaves or gets terminated and has time to copy or even delete all important data) and the list goes on.

My main goal when looking at a new network is to determine that the network has been setup according to best practice settings. These next items are an except from a computerworld article that was posted 8 years ago but are still pertinent today:


1. Use encryption on your wireless access points (AP). Many site surveys have found half or more of all wireless networks are wide open, ripe for anyone to gather all the traffic and perhaps record your sensitive information by sitting in a nearby parked car. Some people mess around with locking down MAC addresses, but that gets unwieldy and a better solution would be to use WPA2 encryption. WPA2 is far better than other encryption methods that are more easily broken into.
2. If you have a wireless network, make sure to hide your SSID (service set identifier), or at least change its name to something common. All wireless routers should have obscure IDs when they announce themselves to the world.  Rather than put in any real information that can make it clear who owns the router or that can divulge your location or business name, such as "Acme Systems, here on the 4th floor" or the product name like "Netgear," use something innocuous like "wireless" or "router1" that doesn't give away anything really critical. In my last apartment, I had neighbors who used their apartment numbers for their IDs, making it real easy to figure out who's router was where.
3. If your router (wired or wireless) has a Web management interface, disable access from the outside network. And change the admin default password now. Most routers have the ability to do both quite easily. You don't want anyone else coming in and changing your settings or reading your log files.
4. Make sure all of your PCs use antivirus software and if you're using Windows, add anti-spyware protection. This seems obvious, but it bears restating. And while you are at it, check to make sure that all of your antivirus subscriptions are current. Anything out of date isn't doing you any good. In my support travels, I've found that this is a very common lapse among my neighbors.
5. If you are running a Web server on your LAN, put it on a DMZ. If your router doesn't have a DMZ, get a new router. Better yet, move to a collocation facility where someone who knows what he is doing can manage it. Having your own local Web server sounds like a good idea, but is a real security sinkhole, and many cable networks have made it harder to host your own from your home network anyway. So why worry?
6. Speaking of Web servers on the Internet, if you have them, you should scan regularly for exploits. There are many sites that can do this, two of my favorites are SPIdynamics.com and Qualys.com. Also, make sure to keep track of your domain registry and change all of your access passwords regularly. If you update your Web content, don't use FTP or Microsoft's Web page creation tool, FrontPage; instead, find more-secure methods that don't send your access passwords in the clear. You can learn about other ways to protect your Web site at OWASP.org.
7. If your ISP offers such an option, use a VPN (virtual private network) for access back to your local LAN or your remote Web server. There are many to choose from, ranging from the free OpenVPN.net to inexpensive but capable ones from SonicWall and Fortinet, which are designed for small business owners.
8. Disable file/print sharing on everything other than your file server. You don't need it on each desktop, and that just causes more vulnerabilities. This is particularly important for laptop users: You don't want to be broadcasting your entire file system to everyone around you at the airport or hotel, which is something that I often see when I travel and check for open network shares.
9. Use whole disk encryption on all laptops that will ever leave home. You never know when someone will steal your data or break into your car or hotel room and lift the laptop. I like PGP Disk, but there are others that cost next to nothing and provide plenty of protection. If you are in the habit of carrying around USB thumb drives with your data, then use one of the more modern U3 drives that work with Windows and are at least password-protected to keep your data away from others. I currently use truecrypt or bitlocker on the laptops now.
10. Start doing regular off-site backups now. At least start with making copies of your key customer and business data, and then make sure you cover your personal files, such as family photos and the like. Now is the time to cook up something simple. Burn DVDs and take them home, or make use of one of the online storage vendors such as eVault and Amazon.com's S3. They cost less than $100 a year (Amazon's less than $10 a year) and can save your data in case of fire, theft or just carelessness. If you have two PCs in two different locations, sign up for Microsoft's Foldershare.com free service to synchronize your data.

This one the technology is kinda dated as dvd's cannot even hold the amount of data that is on most companies networks, but there are now companies like iBackup that will back your critical data up to the cloud

Wednesday, June 11, 2014

Medical Server Closet revamp from start to finish - Part I

Over the memorial day weekend, my associate Alan Randle and I undertook a project that very much needed a makeover. The current setup was garbage (not any of it was the clinics part, the previous ITMS group set it up), the cabling was a mess, looked like a spaghetti factory run amuck. There were cables everywhere, servers added to network placed anywhere and it was total chaos. This is caused by additional peripherals put into the system without a real goal set as to how the cabling will be run. see below:


This is not how a network server closet should look, note that there is a platform at the bottom holding up the servers and UPS units (prior to this picture, the clinic suffered a flood from a burst pipe, luckily the water didn't rise up to destroy the units on the floor, so we put this in there temporarily). After meeting with the Director, we suggested that they put all of the servers and peripherals inside of an a/c cooled cabinet. The cabinet was provided by Liebert systems, model Liebert MCR 22U Model. But before we get to the good part, lets take you through the process from start to finish how we made this happen.

First the closet was too small for the smallest Liebert model to fit into. So we needed to expand the closet 13 inches in width and about 12 inches in depth. We first removed all components from the closet and then we hired a demolition team to get this going, see below:


Now that the closet was totally tore out, the demo crew got busy on the framework, the drywall and the movement of all electrical items (such as the alarm system, card reader components and cctv dvr unit). Once those were repositioned or moved out temporarily, the new closet build begins: 


While the crew was busy tearing down and building up, Alan and I started to put the Liebert unit together. Since this was going to be a clean air enclosed unit, putting the components into the unit in the as is condition that they were in, was not going to fly. So we painstakingly took each component apart and, using compressed canned air, blew out all the dust and particles that were built up in each one. Remember that this network has been in this closet for over 8 years.

You can imagine the buildup of dust and debris that was in each component. Putting them inside the Liebert rack was going to cause the filters to be ruined immediately as they need to be changed every 3-6 months depending on the load of dust accumulation. 

To be continued in next blog.............